God Save The King!
And his kingdom!
Fun With Paints!
Let's use our artistic skills to raise awareness to save lions and other wildlife!
~ * ~ find painting rocks tips below ~ * ~
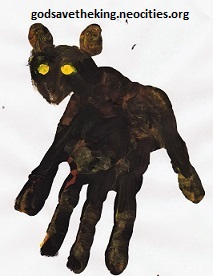
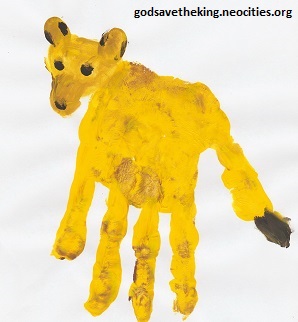
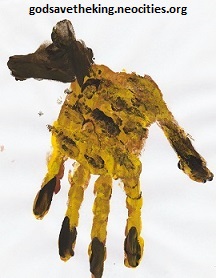
This is a very simple craft that children love. They get to stick their hands and feet into paint, and you get a nice keepsake, too.Coat the palm of your hand or bottom of your bare foot with yellowish craft paint (lions are different shades, so have fun with colors), then press it down on a blank piece of paper. (Do NOT run across the floor, or shake hands with someone, in this condition. They will not be amused. Even if your aunt thinks it's funny and taught you to do it.)
Thicker paper is better, but you can get away with regular copy/printer paper.
Use a generous amount of paint, but not so that it's dripping. If spots miss - like the middle of the palm or foot, or parts of the fingers, just dip a finger into the paint and dab onto the missed spots to fill them in.
Don't mix black with yellow to try to darken it - you'll get a greenish color. Using brown with the yellow works well, and leaving it not completely combined gives you some texture.
For one or two participants, you can squirt the paint right onto the palm of the hand and spread it to cover a bit thickly - be sure to get the outer edge of the thumb, because when you press down, that's what touches the paper. For a group, you can use an upturned plastic frisbee to hold the paint, a deep-dish coated paper plate, or anything big enough that won't absorb the paint and is easy to clean up. Then, press your hand (or foot) into the paint dish then onto the paper like using an ink stamp.
If some paint won't wash off the skin easily, try scrubbing it with some baking soda.
With the hand, you want to keep the thumb side angled down a bit and toward the edge of the paper so you have room for the lion's head on the other side. Your thumb will be the lion's tail. Use your finger to put a switch of black on the end. You can paint a lion's head at the top of the other side, using fingerprints for the ears and mane, or glue one on from other material (using yarn for the mane, for example). You can even glue on wiggly eyes instead of painting them.
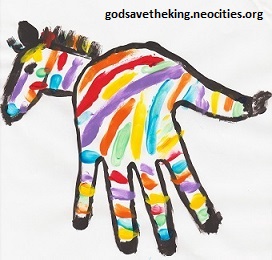
You can make all sorts of animals from a handprint. Leopards, hyenas, zebras... They need something to hunt, don't they? Just give it appropriate features and the right kind of head. The thumb could even be an elephant's trunk, and we've made reindeer faces with a shoe tracing and handprint antlers.
[For the zebra, just trace your hand with pencil instead, then paint over the outline and put on stripes, a head, and a switch on the end of the tail. Remember, zebras have bigger ears than horses! I just use fingerprints for all the ears, anyway.]
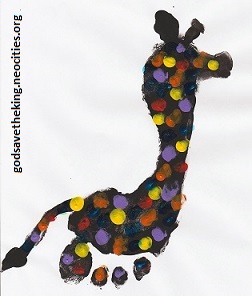
With the footprint version, you want to keep your toes toward the bottom of the page and with enough room around your foot for the tail and head. You can make a lion's face on the heel and put fingerprints around it for a mane. Then, use your finger to draw a tail out from the lion's rump and put a switch of darker hair on the tip.
(Yes, the foot makes five-legged animals, you nit-pickers. If it bothers you, then paint around the piggy-toe to merge it into the body.)
I like the handprint one better, but they're both cute. The footprint one does make a nice giraffe, though...
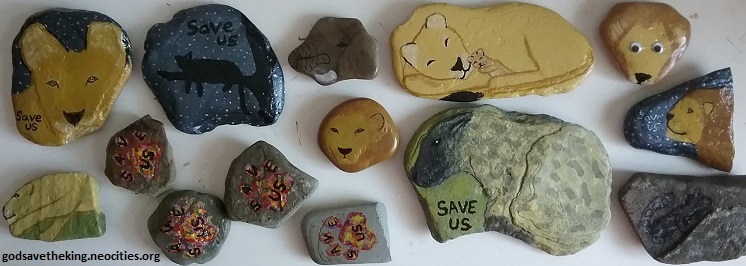
Lions on the prowl!
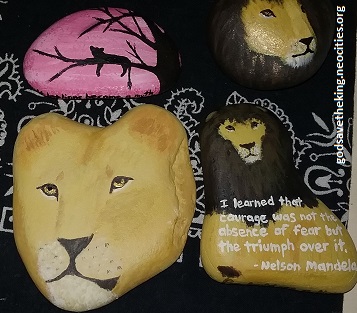
^_^ Yes, (Aug2017) I got sucked in to painting rocks.
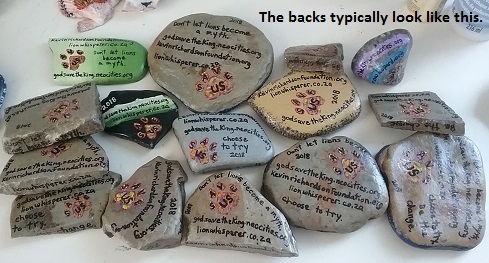
Don't know where this started - I believe someone brought it to PA from Florida or somewhere, and then it hit the little town I lived in. I don't actively look, and even I've seen a bunch (I admire them and leave them for others). [Sept17 one saying "You Rule" was right where I walk. Message for me or not, thanks for the smile! As always, I left it to brighten another's day, too.] If you don't already know, the idea is simply to spread art and joy and fun by painting something inspirational or fun on a rock then hiding it around town for others to find. Some do it just for fun, but generally they like you to take a photo of ones you find and post it to the local facebook page. (Oh, yeah, on the back, you can put the date, #RockOutYourtown, a quote, or whatever you like.) After finding one, you can keep it or re-hide it for someone else to enjoy. Some post clues to where they are. I'm not. ;p
It struck me as a really fun way to spread awareness about wildlife conservation. Join in! We need to be better stewards of the Earth and stop letting destructive people take advantage of our lack of awareness of what they're doing. Look at me: I didn't know lions were so bad off until June 2017! And I soon found out that I wasn't the only one. Yeah, some people don't care, but some people just don't know that even with all our advances people are still getting away with destroying everything in sight without a care, so let's let them know! Paint your own favorite endangered animals onto rocks and spread awareness that they need our protection!
Awareness is key! Choose to try! Be the Change! ^_^
You can find good, flat, smooth rocks (good for scenes and quotes) by any lake, stream, or creek, but smaller ones of different shapes are easily found along dirt roads. When you get them home, clean the rocks. (For really dirty ones, I use an old toothbrush and baking soda to give them a good scrub.) Some people don't bother, but I feel a light rub with damp baking soda on my hands for even clean-looking rocks will make sure there's no residue from anything that might keep the paint from sticking. Let the rocks thoroughly dry before painting.
I also use seashells. ^_^
People usually use acrylic craft paint, but sealer preferences widely differ. I recommend a paint-on sealer - not sprays. (more on that below) My favorite go-to craft sealer is from DecoArt and called DuraClear Satin Varnish. It says it's a polyurethane, indoor/outdoor, water-based and non-yellowing. I had to get a gloss version once and don't like it (they were out of satin). I prefer satin or matte finishes.
I used to use permanent marker for the writing, but I soon learned that even "permanent" marker fades, even if sealed - and especially in the sun. I only used it on the backs, which aren't normally exposed to the uv light, so I wasn't too concerned about it, at first. Yet, I didn't realize how long these rocks last out there! ^_^ Now, sometimes I still write with the marker, but then go over the important parts (like KR's url ;) with paint so they last as long as the front.
Another good trick is, when writing with paint, if you don't have fancy paint-pens or a tiny tip brush, dip a toothpick or sharpened pencil tip into the paint and use that instead. You can get a much finer line like that, and be able to write smaller to fit more on, especially with the smaller rocks. Little ones can also use crayons to draw their own, and you shouldn't need to seal them. I recommend very smooth rocks for those.
Make sure the paint is dry and set before sealing, or you'll smear it. Let the sealer cure at least 24hrs before putting the rock out - or however long your product says to. - Be aware that the sealer will darken unpainted rock. That's fine on light rock, but I had to go back over some of my writing on dark rocks that could be read fine before sealing (and then add sealer over the rewrites). So, sometimes, I'll paint a background of light color and "write" over that.
Seems people prefer brush-on sealer - I do, but all I had is spray-on when I started. Others say not to use that, but they don't say WHY. My experience is that it's more likely to smear the paint and is harder to get even coverage with. Sprays are also fumey and bad for the environment, so when I was able to get paint-on sealer, I happily switched. It dries to the touch pretty quickly, but I like to let it set at least a few hours before I turn it over to work on the other side. ~ Be sure your sealer is rated for exterior use and check whether it says "non-yellowing". Ones that don't may look nice for a few weeks, but then yellow as the varnish/sealer ages. If you want an antiqued look, that's a good thing; but if you want it to stay clear, use "non-yellowing".
Note: My experience with Mod Podge or découpage glue/sealer is that you need to let it cure 6 weeks, and even then it will cloud when it gets wet for extended periods (like dew on it outside) so still needs an exterior/finishing sealer over it. So, just beware if you use that.
I let the rock tell me what to put on it. Many of them already have lines and contours that just scream for a certain image. Of course, I'm the type that sees all kinds of shapes in clouds and floor prints and wood grains, so that part comes easy to me. Here's a close up of one of the coral reefs. Great example of using what the rock gives you: It had seashell imprints, a seahorse shape and was very, very bumpy. Great fun!
I didn't plan on doing any elephants, but that's exactly what one rock was. All I did was put a bit of white on the tusk and some lines to make the trunk stand out. ...and that ram's head! I really wanted that one to be a lioness, but the shape just would not let me. (It was the perfect shape of a ram - a lioness is longer and more rounded.) I just gave him a horn and facial features. In the below photo are examples of rocks naturally shaped like a lioness' head and a sitting lion.
Please, be respectful of private property and do not take painted rocks you see in someone's flowerbeds or decorating their porches - or from gravesites. Let's use some common sense out there. Rocks up for grabs will be in public areas and be marked as such. Let's keep this fun! Check out my Rock Out Lions page to see the growing number of rocks I've painted.
~ * ~ * ~*~ * ~ * ~
Be a steward of the Earth.
[I'm not a professional and have limited resources/access. I make the printable coloring page images to be around 8x11 inches to fill a sheet of regular letter-size paper when printed. Coloring pages may be printed from here and made copies of for non-profit, free-of-charge use only. Plant seeds! ^_^]

